
spout

September 12, 2015 spout

Choose HTML for UI Development

Choose HTML for UI Development

On Sept. 10, 2015, Winston Kodogo writes:

Hey Chris, if you’re feeling happy enough to blog, how about a post giving us your current thoughts on UI development. A friend of mine has asked me for advice on moving an in-house app from VB6 to something he can find people to modify if he needs to, and I can’t for the life of me think of what to tell him. I have your most excellent books on Windows Forms and WPF, but what would the modern (!) equivalent be. Not WebJS, surely.

Thanks for the softball question, Winston. I do love to pontificate extemporaneously (although I have already given away the ending).

Pre-Windows

I started my Windows career as a Petzoldian Windows developer, but before that, I developed UIs in curses, Flavors Lisp and even voice-based UIs in a proprietary AT&T scripting language for which I no longer remember the name.

Windows

As a Windows developer, I programmed against 16 and 32-bit GDI and User, GDI+, MFC, WTL, Windows Forms, WPF, WinJS, Silverlight and Xamarin Forms. I’ve even written books, articles and presentations about many of these toolkits.

And even now, as I type this, I’m using a different framework, Markdown, to produce the UI you’re using now.

Transcend Windows

It’s this last fact that leads me to my pretty much universal recommendation for UI development: The UI framework with the most reach, the best tools, the most community support and the best staying power is, of course, HTML, with it’s kissing cousins, JavaScript and CSS.

There are good reasons to choose others, of course:

  • Are you building a desktop game? Use OpenGL or DirectX.

  • Are you building a mobile game? Use the iOS or Android APIs or, even better, Unity.

  • Do you love C# and .NET? Then some implementation of XAML may suit your needs.

  • Are you targeting developers with automation or specific integration needs? Then a command line interface is probably what you want.

But other than that, my default UI development advice is always always HTML.

HTML How

The beauty of an HTML-based UI framework is that it has grown steadily in capability, usage and ubiquity since it was introduced in 1993. It’s hard to find an environment where HTML doesn’t run:

  • Desktop Browser: This is where HTML was first shown and it arguably shows best here. There’s little you can’t do in this environment, including near native games using WebGL, Enscripten and asm.js (soon to become WebAssembly).

    This is probably your best bet for any kind of internal app, e.g. the kind of thing that VB6 and WinForms are usually used for. Toolkits like Angular and React are popular for desktop browser apps because they provide the end-to-end developer story while still having rich extension libraries.

    That said, if I were going to tackle a new web site or web app today, I’d probably use WebComponents (and Polymer) for the excellent reasons that Joe Gregorio lays out in his OSCON 2015 talk.

  • Mobile Browser: Today’s smartphone-based browsers are very capable and adapt to desktop-based web sites fairly well. However, I do recommend making sure your desktop web sites work well on mobile as well, if for no other reason than you want to make sure you don’t lose your ranking on Google, which now prefers mobile-friendly sites for mobile search results (and provides a tool to help you get your site ready).

    With the modern enterprise moving towards mobile as fast now as they have been moving towards the web-based intranet over the last decade, I’d recommend making sure that your internal web sites/apps work well on mobile if you want to avoid the CTO stopping by your desk in the near future.

  • Desktop Stand-alone App: The new trend (with companies like GitHub and Microsoft on board) for building cross-platform, stand-alone desktop apps is to use HTML, but package it into an app, specifically using something like Electron. This is the new hotness, but this is what I’d do if I wanted to build a stand-alone desktop app today.

  • Mobile Store App: Most mobile apps today are built for the iOS and Google Play stores, although increasingly enterprises are building mobile apps for internal use and distributing them internally using private stores like Appaloosa.

    Today, mobile apps are built overwelminging using the platform-specific native APIs, most often with two separate teams for each app, one for iOS and one for Android. However, as mobile becomes more of an enterprise platform, you want apps that are developed quickly, can be maintained easily and can be built with a smaller number of developers, which all boils down to one thing: you want to have a single codebase for your internal mobile apps instead of one codebase per platform.

    Today, you have two viable alternatives when building mobile apps that target multiple platforms from a single source code base: Xamarin and Adobe PhoneGap. Xamarin is essentially cross-platform .NET with some UI controls and native compilation thrown in, whereas PhoneGap is a framework for hosting HTML on mobile platforms (as well as others, but no one does that) along with a platform-agnostic JavaScript API that maps to native functionality.

    I’ve used both of these frameworks and they both have their pros and cons. Xamarin has a simple UI framework that changes it’s look n’ feel depending on the platform your app is running on, but PhoneGap does not. In that case, I’d also bring Ionic into the mix, which will let you write your app in HTML but give you the native UI as appropriate (and a beautiful one at that).

    There has been much said about whether HTML is appropriate for building mobile apps and while it’s possible to build a bad app using any platform, in my experience, it’s not hard to get an app that’s built in HTML to look n’ feel just like a native app. When I did it, there were some tricks involved, but frameworks like Ionic pretty much take away the need for that these days. Of course there are always going to be apps that can’t be built this way, but as a percentage (leaving out twitch games), that number is getting smaller and smaller.

Where are we?

Of course, the best and worst part of the web platform is that the community changes it’s mind about how sites and apps should be built for the web platform about as often as I change my underwear, so the specific recommendations are merely appropriate for this point in time. The general guidance remains the same, however: choose HTML for your UI development unless you’ve got a darn good reason not to.

January 4, 2015 .net spout

Handling Orientation Changes in Xamarin.Forms Apps

Handling Orientation Changes in Xamarin.Forms Apps

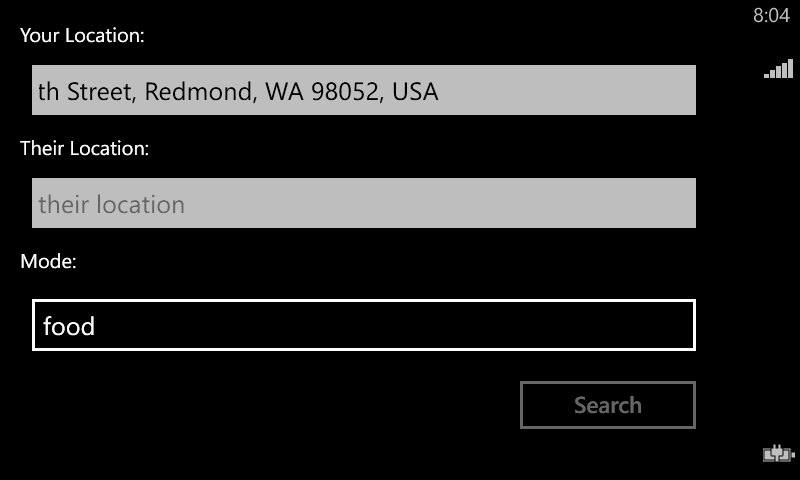
By default, Xamarin.Forms handles orientation changes for you automatically, e.g.

ss1[5]

ss4

Xamarin.Forms handles orientation changes automatically

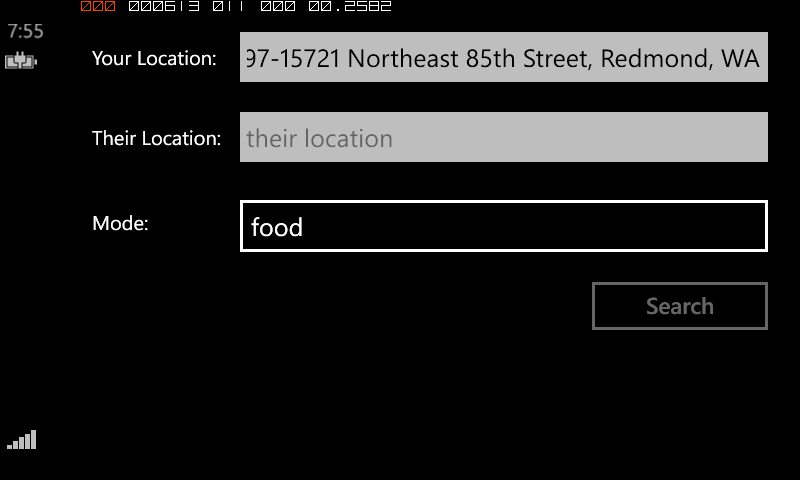
In this example, the labels are above the text entries in both the portrait and the landscape orientation, which Xamarin.Forms can do without any help from me. However, what if I want to put the labels to the left of the text entries in landscape mode to take better advantage of the space? Further, in the general case, you may want to have different layouts for each orientation. To be able to do that, you need to be able to detect the device’s current orientation and get a notification when it changes. Unfortunately, Xamarin.Forms provides neither, but luckily it’s not hard for you to do it yourself.

Finding the Current Orientation

To determine whether you’re in portrait or landscape mode is pretty easy:

static bool IsPortrait(Page p) { return p.Width < p.Height; }

This function makes the assumption that portrait mode has a smaller width. This doesn’t work for all future imaginable devices, of course, but in the case of a square device, you’ll just have to take your changes I guess.

Orientation Change Notifications

Likewise, Xamarin.Forms doesn’t have any kind of a OrientationChanged event, but I find that handling SizeChanged does the trick just as well:

SizeChanged += (sender, e) => Content = IsPortrait(this) ? portraitView : landscapeView;

The SizeChanged event seems to get called exactly once as the user goes from portrait to landscape mode (at least in my debugging, that was true). The different layouts can be whatever you want them to be. I was able to use this technique and get myself a little extra vertical space in my landscape layout:

ss2

Using a custom layout to put the labels on the left of the text entries instead of on top 

Of course, I could use this technique to do something completely differently in each orientation, but I was hoping that the two layouts made sense to the user and didn’t even register as special, which Xamarin.Forms allowed me to do.

January 2, 2015 .net spout

Launching the Native Map App from Xamarin.Forms

My goal was to take the name and address of a place and show it on the native map app regardless of what mobile platform on which my app was running. While Xamarin.Forms provides a cross-platform API to launch the URL that starts the map app, the URL format is different depending on whether you’re using the Windows Phone 8 URI scheme for Bing maps, the Android Data URI scheme for the map intent or the Apple URL scheme for maps.

This is what I came up with:

public class Place {
  public string Name { get; set; }
  public string Vicinity { get; set; }
  public Geocode Location { get; set; }
  public Uri Icon { get; set; }
}
public void
LaunchMapApp(Place place) { // Windows Phone doesn't like ampersands in the names and the normal URI escaping doesn't help var name = place.Name.Replace("&", "and"); // var name = Uri.EscapeUriString(place.Name); var loc = string.Format("{0},{1}", place.Location.Latitude, place.Location.Longitude); var addr = Uri.EscapeUriString(place.Vicinity); var request = Device.OnPlatform( // iOS doesn't like %s or spaces in their URLs, so manually replace spaces with +s string.Format("http://maps.apple.com/maps?q={0}&sll={1}", name.Replace(' ', '+'), loc), // pass the address to Android if we have it string.Format("geo:0,0?q={0}({1})", string.IsNullOrWhiteSpace(addr) ? loc : addr, name), // WinPhone string.Format("bingmaps:?cp={0}&q={1}", loc, name) ); Device.OpenUri(new Uri(request)); }

This code was testing on several phone and tablet emulators and on 5 actual devices: an iPad running iOS 8, an iPad Touch running iOS 8, a Nokia Lumia 920 running Windows Phone 8.1, an LG G3 running Android 4.4 and an XO tablet running Android 4.1. As you can tell, each platform has not only it’s own URI format for launching the map app, but quirks as well. However, this code works well across platforms. Enjoy.

January 1, 2015 .net spout

App and User Settings in Xamarin.Forms Apps

App and User Settings in Xamarin.Forms Apps

Settings allow you to separate the parameters that configure the behavior of your app separate from the code, which allows you to change that behavior without rebuilding the app. This is handle at the app level for things like server addresses and API keys and at the user level for things like restoring the last user input and theme preferences. Xamarin.Forms provides direct support for neither, but that doesn’t mean you can’t easily add it yourself.

App Settings

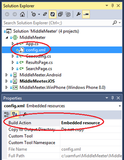
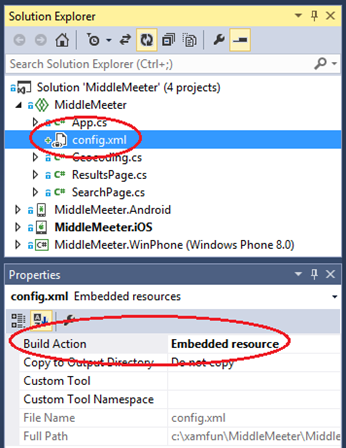
Xamarin.Forms doesn’t have any concept of the .NET standard app.config. However, it’s easy enough to add the equivalent using embedded resources and the XML parser. For example, I built a Xamarin.Forms app for finding spots for coffee, food and drinks between where I am and where my friend is (MiddleMeeter, on GitHub). I’m using the Google APIs to do a bunch of geolocation-related stuff, so I need a Google API key, which I don’t want to publish on GitHub. The easy way to make that happen is to drop the API key into a separate file that’s loaded at run-time but to not check that file into GitHub by adding it to .gitignore. To make it easy to read, I added this file as an Embedded Resource in XML format:

image

Adding an XML file as an embedded resource makes it easy to read at run-time for app settings

I could’ve gone all the way and re-implemented the entire .NET configuration API, but that seemed like overkill, so I kept the file format simple:

<?xml version="1.0" encoding="utf-8" ?>
<config>
  <google-api-key>YourGoogleApiKeyHere</google-api-key>
</config>

Loading the file at run-time uses the normal .NET resources API:

string GetGoogleApiKey() {
  var type = this.GetType();
  var resource = type.Namespace + "." +
Device.OnPlatform("iOS", "Droid", "WinPhone") + ".config.xml"; using (var stream = type.Assembly.GetManifestResourceStream(resource)) using (var reader = new StreamReader(stream)) { var doc = XDocument.Parse(reader.ReadToEnd()); return doc.Element("config").Element("google-api-key").Value; } }

I used XML as the file format not because I’m in love with XML (although it does the job well enough for things like this), but because LINQ to XML is baked right into Xamarin. I could’ve used JSON, too, of course, but that requires an extra NuGet package. Also, I could’ve abstracting things a bit to make an easy API for more than one config entry, but I’ll leave that for enterprising readers.

User Settings

While app settings are read-only, user settings are read-write and each of the supported Xamarin platforms has their own place to store settings, e.g. .NET developers will likely have heard of Isolated Storage. Unfortunately, Xamarin provides no built-in support for abstracting away the platform specifics of user settings. Luckily, James Montemagno has. In his Settings Plugin NuGet package, he makes it super easy to read and write user settings. For example, in my app, I pull in the previously stored user settings when I’m creating the data model for the view on my app’s first page:

class SearchModel : INotifyPropertyChanged {
  string yourLocation;
  // reading values saved during the last session (or setting defaults)
  string theirLocation = CrossSettings.Current.GetValueOrDefault("theirLocation", "");
  SearchMode mode = CrossSettings.Current.GetValueOrDefault("mode", SearchMode.food);
  ...
}

The beauty of James’s API is that it’s concise (only one function to call to get a value or set a default if the value is missing) and type-safe, e.g. notice the use of a string and an enum here. He handles the specifics of reading from the correct underlying storage mechanism based on the platform, translating it into my native type system and I just get to write my code w/o worrying about it. Writing is just as easy:

async void button1_Clicked(object sender, EventArgs e) {
  ...

  // writing settings values at an appropriate time
  CrossSettings.Current.AddOrUpdateValue("theirLocation", model.TheirLocation);
  CrossSettings.Current.AddOrUpdateValue("mode", model.Mode);

  ...
}

My one quibble is that I wish the functions were called Read/Write or Get/Set instead of GetValueOrDefault/AddOrUpdateValue, but James’s function names make it very clear what’s actually happening under the covers. Certainly the functionality makes it more than worth the extra characters.

User Settings UI

Of course, when it comes to building a UI for editing user settings at run-time, Xamarin.Forms has all kinds of wonderful facilities, including a TableView intent specifically for settings (TableIntent.Settings). However, when it comes to extending the platform-specific Settings app, you’re on your own. That’s not such a big deal, however, since only iOS actually supports extending the Settings app (using iOS Settings Bundles). Android doesn’t support it at all (they only let the user configure things like whether an app has permission to send notifications) and while Windows Phone 8 has an extensible Settings Hub for their apps, it’s a hack if you do it with your own apps (and unlikely to make it past the Windows Store police).

Where Are We?

So, while Xamarin.Forms doesn’t provide any built in support for app or user settings, the underlying platform provides enough to make implementing the former trivial and the Xamarin ecosystem provides nicely for the latter (thanks, James!).

Even more interesting is what Xamarin has enabled with this ecosystem. They’ve mixed their very impressive core .NET and C# compiler implementation (Mono) with a set of mobile libraries providing direct access to the native platforms (MonoTouch and MonoDroid), added a core implementation of UI abstraction (Xamarin.Forms) and integration into the .NET developer’s IDE of choice (Visual Studio) together with an extensible, discoverable set of libraries (NuGet) that make it easy for 3rd party developers to contribute. That’s a platform, my friends, and it’s separate from the one that Microsoft is building. What makes it impressive is that it takes the army of .NET developers and points them at the current hotness, i.e. building iOS and Android apps, in a way that Microsoft never could. Moreover, because they’ve managed to also support Windows Phone pretty seamlessly, they’ve managed to get Microsoft to back them.

We’ll see how successful Xamarin is over time, but they certainly have a very good story to tell .NET developers.

November 1, 2014 spout

Microsoft Fan Boy Goes To Google

Microsoft Fan Boy Goes To Google

In 1992, I was a Unix programmer in Minneapolis. I’d graduated with a BS in Computer Science from the University of MN a year earlier and had written my programming assignments in C and C++ via first a VT100 terminal and then a VT100 terminal emulator on my Mac (running System 7, if you’re curious). My day job was at an AT&T VAR building multi-user voice response systems on Unix System V. My favorite editor was vi (not vim) and, like all good vi programmers, I hated emacs with a white hot passion.

Being bored with my current job, I posted my resume on the internet, which meant uploading it in ASCII text to an FTP site where tech companies knew to look for it. The tech company that found it was Intel. To prepare for my interview in Portland, OR, I went to play with a Windows 3.1 machine that someone had set up in the office, but nobody used. I had a Mac at home and Unix at work and for the 10 minutes that I could stand to use it, Windows 3.1 seemed like the worst of both. In spite of my distaste, Intel made an offer I couldn’t refuse and I found myself moving with my new wife to a new city for a new job and a new technology stack.

The move to Intel started my love affair with Windows (starting with Windows 95, of course, let’s be reasonable). Over the years, I grew to love Word, Excel, Visio, PowerPoint, Outlook, Live Writer, Skype, Windows XP, Windows 7, COM, ATL, .NET, C# and of course the Big Daddy for Windows developers: Visual Studio. Not only did I become a Windows fan boy (I can’t tell you how lonely it is to own a Windows Phone after the iPhone was released), but I became I contributing member of the Windows community, accounting for nearly 100% of the content on this web site, first published in 1995 solely to provide links to my DevelopMentor students, but growly steadily since (over 2600 posts in 20 years). Add to that to more than a dozen books and countless public speaking engagements, magazine articles and internet appearances and you’ve got a large investment in the Windows technology stack.

Of course, as I take on roles beyond consultant, speaker, author and community PM, I contribute less and less (although I do love spouting off into my twitter feed). Even so, I’ve been a regular attendee to Windows-related events and 90% of my friends are also Windows developers, so the idea of leaving not just a technology ecosystem but an entire community behind is a pretty daunting one.

And then, about 45 days ago, Google came knocking with an offer I couldn’t refuse. A few days after that, before I’ve even officially accepted the offer, I find myself in a bidding war for a house in Kirkland, WA that the wife and I both love (which almost never happens). So, for the first time since 1992, with my three boys graduated from high school, I find myself moving with my new wife to a new city for a new job and a new technology stack. As I write this, it’s the Friday before my Noogler orientation week (New Googler — get it?). I’ll be working on tools for Google cloud developers, which matches my Windows experience helping developers build distributed systems, although there’s going to be a huge learning curve swapping in the details.

After 20 years with Visual Studio, I don’t know if my fingers still know vi, but I can’t wait to find out. If I get a beer or two in me, I might even give emacs another try…

July 21, 2014 spout interview

Future Proof Your Technical Interviewing Process: The Phone Screen

Future Proof Your Technical Interviewing Process: The Phone Screen

In 30 years, I’ve done a lot of interviewing from both sides of the table. Because of my chosen profession, my interviewing has been for technical positions, e.g. designers, QA, support, docs, etc., but mostly for developers and program managers, both of which need to understand a system at the code level (actually, I think VPs and CTOs need to understand a system at the code level, too, but the interview process for those kinds of people is a superset of what I’ll be discussing in this series).

In this discussion, I’m going to assume you’ve got a team doing the interview, not just a person. Technical people need to work well in teams and you should have 3-4 people in the interview cycle when you’re picking someone to join the team.

The Most Important Thing!

Let me state another assumption: you care about building your team as much as you care about building your products. Apps come and go, but a functional team is something you want to cherish forever (if you can). If you just want to hire someone to fill a chair, then what I’m about to describe is not for you.

The principle I pull from this assumption is this: it’s better to let a good candidate go then to hire a bad one.

A bad hire can do more harm than a good hire can repair. Turning down a pretty good” candidate is the hardest part of any good interview process, but this one principle is going to save you more heartache than any other.

The Phone Screen

So, with these assumptions in mind, the first thing you always want to do when you’ve got a candidate is to have someone you trust do a quick phone screen, e.g. 30 minutes. This can be an HR person or someone that knows the culture of the company and the kind of people you’re looking for. A phone screen has only one goal: to avoid wasting the team’s time. If there’s anything that’s an obvious mismatch, e.g. you require real web development experience, but the phone screen reveals that the candidate really doesn’t, then you say thanks very much” and move on to the next person.

If it’s hard to get a person to come into your office — maybe they’re in a different city — you’ll also want to add another 30 minutes to do a technical phone screen, too, e.g.

  • Describe the last app they built with Angular.
  • Tell me how JVM garbage collection works.
  • What’s the right data structure to hold the possible solutions to tic-tac-toe?

Whatever it is, you want to make reasonably sure that they’re going to be able to keep up with their duties technically before you bring them on site, or you’re just wasting the team’s time.

At this point, if you’re hiring a contractor, you may be done. Contractors are generally easy to fire, so you can bring them on and let them go easily. Some companies start all of their technical hires as contractors first for a period of 30-90 days and only hire them if that works out.

If you’re interviewing for an FTE position, once they’ve passed the phone screen, you’re going to bring them into the office.

You should take a candidate visit seriously; you’re looking for a new family member. Even before they show up, you make sure you have a representative sample of the team in the candidate’s interview schedule. At the very least, you need to make sure that you have someone to drill into their technical abilities, someone to deal with their ability to deliver as part of a team and someone to make sure that they’re going to be a cultural fit with the company as a whole. Each of these interview types is different and deserves it’s own description.

Future Posts in This Series

Tune in to future posts in this series where we’ll be discussing:

July 17, 2014 spout

Moving My ASP.NET Web Site to Disqus

Moving My ASP.NET Web Site to Disqus

I’m surprised how well that my commentRss proposal has been accepted in the world. As often as not, if I’m digging through an RSS feed for a site that supports comments, that site also provides a commentRss element for each item. When I proposed this element, my thinking was that I could make a comment on an item of interest, then check a box and I’d see async replies in my RSS client, thereby fostering discussion. Unfortunately, RSS clients never took the step of allowing me to subscribe to comments for a particular item and a standard protocol for adding a comment never emerged, which made it even less likely for RSS clients to add that check box. All in all, commentRss is a failed experiment.

Fostering Discussion in Blog Post Comments

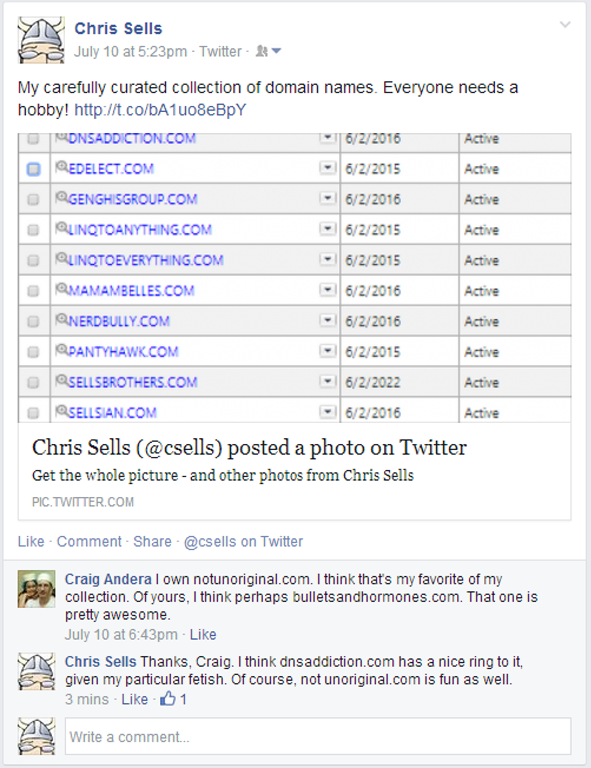
However, the idea of posting comments to a blog post and subscribing to replies took off in another way. For example, Facebook does a very good job in fostering discussion on content posted to their site:
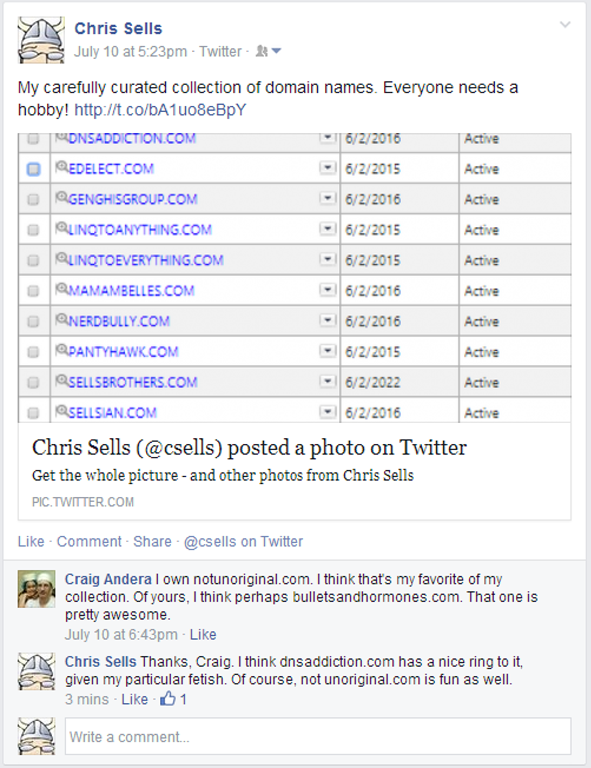
image

The Facebook supports comments and discussions nicely


Not only does Facebook provide a nice UI for comments, but as I reply to comments that others have made, they’re notified. In fact, as I was taking the screenshot above, I replied to Craig’s comment and within a minute he’d pressed the Like button, all because of the support Facebook has for reply notification.

However, Facebook commenting only works for Facebook content. I want the same kind of experience with my own site’s content. For a long time, I had my own custom commenting system, but the bulk of the functionality was around keeping spam down, which was a huge problem. I recently dumped my comments to an XML format and of the 60MB of output, less than 8MB were actual comments — more than 80% was comment spam. I tried added reCAPTCHA and eventually email approval of all comments, but none of that fostered the back-and-forth discussions over time because I didn’t have notifications. Of course, to implement notifications, you need user accounts with email verification, which was a whole other set of features that I just never got around to implementing. And even if I did, I would have taken me a lot more effort to get to the level of quality that Disqus provides.

Integrating Disqus Into Your Web Site

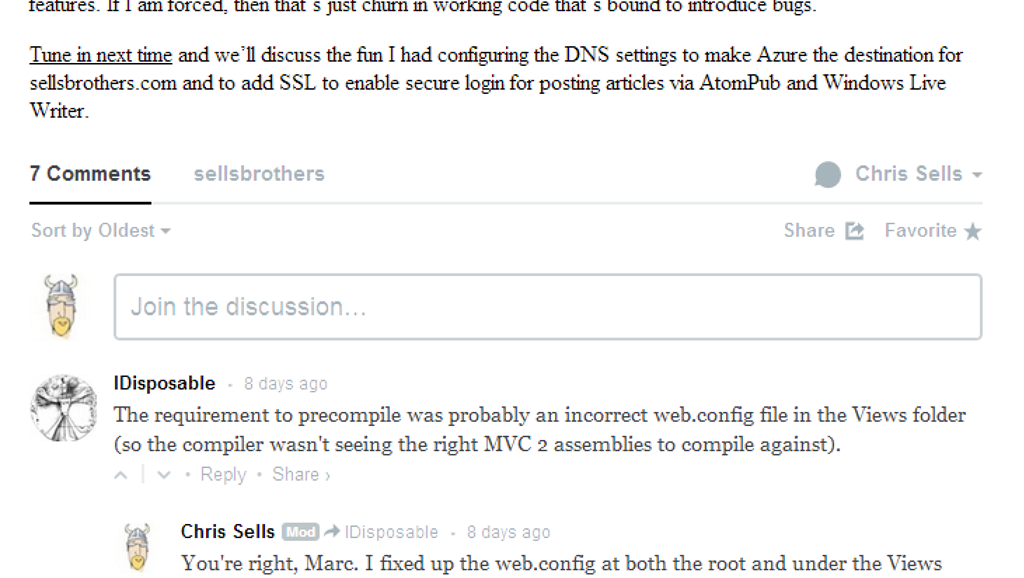
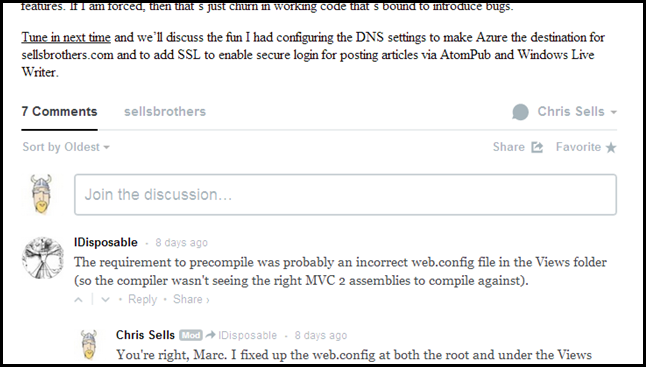
Disqus provides a service that lets me import, export and manage comments for my site’s blog posts, the UI for my web site to collect and display comments and the notification system that fosters discussions. And they watch for spam, too. Here’s what it looks like on a recent post on my site:
image

The Disqus services provides a discussion UI for your web site


Not only does Disqus provide the UI for comments, but it also provides the account management so that commenters can have icons and get notifications. With the settings to allow for guest posting, the barrier to entry for the reader that wants to leave a comment is zero. Adding the code to enable it on your site isn’t zero, but it’s pretty close. Once you’ve established a free account on disqus.com, you can simply create a forum for your site and drop in some boilerplate code. Here’s what I added to my MVC view for a post’s detail page to get the discussion section above:

<%-- Details.aspx –%>
...
<asp:Content ID="Content2" ContentPlaceHolderID="MainContent" runat="server">
  <!-- post –>
  ...
  <h1><%= Model.Post.Title %></h1>
  <div><%= Model.Post.Content %></div>
  <!-- comments -->
  <div id="disqus_thread"></div>
  <script type="text/javascript">
    var disqus_shortname = "YOUR-DISQUS-SITE-SHORTNAME-HERE";
    var disqus_identifier = <%= Model.Post.Id %>;
    var disqus_title = "<%= Model.Post.Title %>";

    /* * * DON'T EDIT BELOW THIS LINE * * */
    (function () {
      var dsq = document.createElement('script'); dsq.type = 'text/javascript'; dsq.async = true;
      dsq.src = '//' + disqus_shortname + '.disqus.com/embed.js';
      (document.getElementsByTagName('head')[0] || document.getElementsByTagName('body')[0]).appendChild(dsq);
    })();
  </script>
</asp:Content>

The discussion section for any post is just a div with the id set to disqus_thread”. The code is from the useful-but-difficult-to-find Disqus universal embed code docs. The JavaScript added to the end of the page creates a Disqus discussion control in the div you provide using the JS variables defined at the top of the code. The only JS variable that’s required is the disqus_shortname, which defines the Disqus data source for your comments. The disqus_identifier is a unique ID associated with the post. If this isn’t provided, the URL for the page the browser is currently showing will be used, but that doesn’t work for development mode from localhost or if the comments are hosted on multiple sites, e.g. a staging server and a production server, so I recommend setting disqus_identifier explicitly. The disqus_title will likewise be taken from the current page’s title, but it’s better to set it yourself to make sure it’s what you want.

And that’s it. Instead of tuning your UI in the JS code, you do so in the settings on disqus.com yourself an includes things like the default order of comments, the color scheme, how much moderation you want, etc.

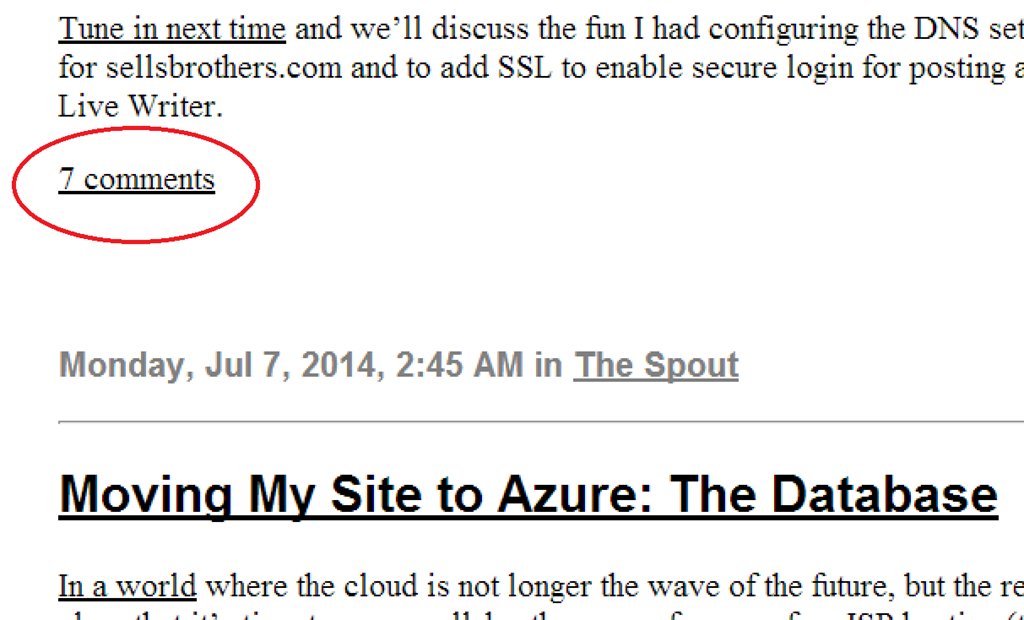
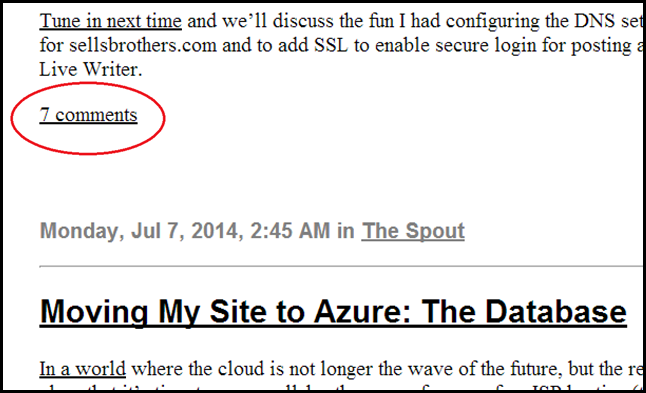
There’s one more page on your site where you’ll want to integrate Disqus: the page the provides the list of posts along with the comment link and comment count:
image

Disqus will add comment count to your comment lists, too


Adding support for the comment count is similar to adding support for the discussion itself:

<%-- Index.aspx --%>
...
<asp:Content ID="Content2" ContentPlaceHolderID="MainContent" runat="server">
  ...
  <!-- post -->
  <h2><%= Html.ActionLink(post.Title, "Details", "Posts", new { id = post.Id }, null) %></h2>
  <p><%= post.Content %></p>
  <!-- comment link --> 
  <p><%= Html.ActionLink("0 comments", "Details", "Posts", null, null, "disqus_thread",
new RouteValueDictionary(
new { id = post.Id }),
new Dictionary<string, object>() { { "data-disqus-identifier", post.Id } }) %></p> ...
  <script type="text/javascript">
    // from: https://help.disqus.com/customer/portal/articles/565624
    var disqus_shortname = "sellsbrothers";

    /* * * DON'T EDIT BELOW THIS LINE * * */
    (function () {
      var s = document.createElement('script'); s.async = true;
      s.type = 'text/javascript';
      s.src = 'http://' + disqus_shortname + '.disqus.com/count.js';
      (document.getElementsByTagName('HEAD')[0] || document.getElementsByTagName('BODY')[0]).appendChild(s);
    }());
  </script>
</asp:Content>

Again, this code is largely boilerplate and comes from the Disqus comment count docs. The call to Html.ActionLink is just a fancy way to get an A tag with an href of the following format:

<a href=“/Posts/Details/<<POST-ID>>#disqus_thread data-disqus-identifier=“<<POST-ID>>”>0 comments</a>

The disqus_thread” tag at the end of the href does two things. The first is that it provides a link to the discussion portion of the details page so that the reader can scroll directly to the comments after reading the post. The second is that it provides a tag for the Disqus JavaScript code to change the text content of the A tag to show the number of comments.

The data-disqus-identifier” attribute sets the unique identifier for the post itself, just like the disqus_identifier JS variable we saw earlier.

The A tag text content that you provide will only be shown if Disqus does not yet know about that particular post, i.e. if there are no comments yet, then it will leave it alone. However, if Disqus does know about that post, it will replace the text content of the A tag as per your settings, which allow you to be specific about how you want 0, 1 and n comments to show up on your site; 0 comments”, 1 comment” and {num} comments” are the defaults.

Importing Existing Comments into Disqus

At this point, your site is fully enabled for Disqus discussions and you can deploy. In the meantime, if you’ve got existing comments like I did, you can import them using Disqus’s implementation of the WordPress WXR format, which is essentially RSS 2.0 with embedded comments. The Disqus XML import docs describe the format and some important reminders. The two reminders they list are important enough to list again here:

  • Register a test forum and import to that forum first to work out the kinks.” Because Disqus only lists some of the restrictions on their site for the imported data, I probably had to do a dozen or more imports before I get everything to move over smoothly. I ended up using two test forums before I was confident enough to import comments into my the real forum for my site.
  • Keep individual file sizes < 50 MB each.” In fact, I found 20MB to be the maximum reliable size. I had to write my script to split my comments across multiple files to keep to this limit or my uploads would time out.


The XML import docs do a good job showing what the XML format is as an example, but they only list one of the data size requirements. In my work, I found several undocumented limits as well:

  • comment_content must be >= 3 characters (space trimmed) and <= 25,000 characters. I found out the max when trying to import some of my unapproved spam comments.
  • comment_author and comment_author_email must be <= 75 characters. You may get errors about comment_author being too long even if you haven’t provided one; that just means that Disqus has grabbed comment_author_email as the contents for comment_author.
  • post_date_gmt and comment_date_gmt must be formatted correctly as yyyy-MM-dd HH:mm:ss. Of course, they must be in GMT, too.
  • The actual post content should be empty. Even though it looks like you’re uploading your entire blog via RSS, you’re only providing enough of the post content to allow Disqus to map from post to associated comments, like the thread_identifier referenced as disqus_thread in the JavaScript code above, as well as to show the post title and date as appropriate. The only real content you’re importing into Disqus is the comment content associated with each post.

Something else to keep in mind is that as part of the comment import process is that Disqus translates the XML data into JSON data, which makes sense. However, they report their errors in terms of the undocumented JSON data structure, which can be confusing as hell. For example, I kept getting a missing or invalid message” error message along with the JSON version of what I thought the message was to which they were referring. The problem was that by message”, Disqus didn’t mean the JSON data packet for a particular comment,” they meant the field called message’ in our undocumented JSON format which is mapped from the comment_content element of the XML.” I went round and round with support on this until I figured that out. Hopefully I’ve saved future generations that trouble.

If you’re a fan of LINQPad or C#, you can see the script I used to pull the posts and comments out of my site’s SQL Server database (this assumes an Entity Framework mapping in a separate DLL, but you get the gist). The restrictions I mention above are encapsulated in this script.

Where Are We?

Even though my rssComments extension to the RSS protocol was a failed experiment, the web has figured out how to foster spam-free, interactive discussions with email notifications across web sites. The free Disqus service provides as implementation of this idea and it does so beautifully. I wish importing comments was as easy as integrating the code, but since I only had to do it once, the juice was more than worth the squeeze, as a dear Australian friend of mine likes to say. Enjoy!


July 11, 2014 spout

Moving My Site to Azure: DNS & SSL

Moving My Site to Azure: DNS & SSL

This part 3 of a multi-part series on taking a real-world web site (mine) written to be hosted on an ISP (securewebs.com) and moving it to the cloud (Azure). The first two parts talked about moving my SQL Server instance to SQL Azure and getting my legacy ASP.NET MVC 2 code running inside of Visual Studio 2013 and published to Azure. In this installment, we’ll discuss how I configured DNS and SSL to work with my shiny new Azure web site.

Configuring DNS

Now that I have my site hosted on http://sellsbrothers.azurewebsites.net, I’d like to change my DNS entries for sellsbrothers.com and www.sellsbrothers.com to point to it. For some reason I don’t remember, I have my domain’s name servers pointed at microsoftonline.com and I used Office365 to manage them (it has something to do with my Office365 email account, but I’m not sure why that matters…). Anyway, in the Manage DNS section of the Office365 admin pages, there’s a place to enter various DNS record types. To start, I needed to add two CNAME records:

image

The CNAME records needed to be awarded an IP address by Azure


A CNAME record is an alias to some other name. In this case, we’re aliasing the awveryify.sellsbrothers.com FQDN (the Host name field is really just the part to the left of the domain name to which you’re adding records, sellsbrothers.com in this case). This awverify string is just a string that Azure needs to see before it will tell you the IP address that it’s assigned to you as a way to guarantee that you do, in fact, own the domain. The www host name maps to the Azure web site name, i.e. mapping www.sellsbrothers.com to sellsbrothers.azurewebsites.net. The other DNS record I need is an A record, which maps the main domain, i.e. sellsbrothers.com, to the Azure IP address, which I’ll have to add later once Azure tells me what it is.

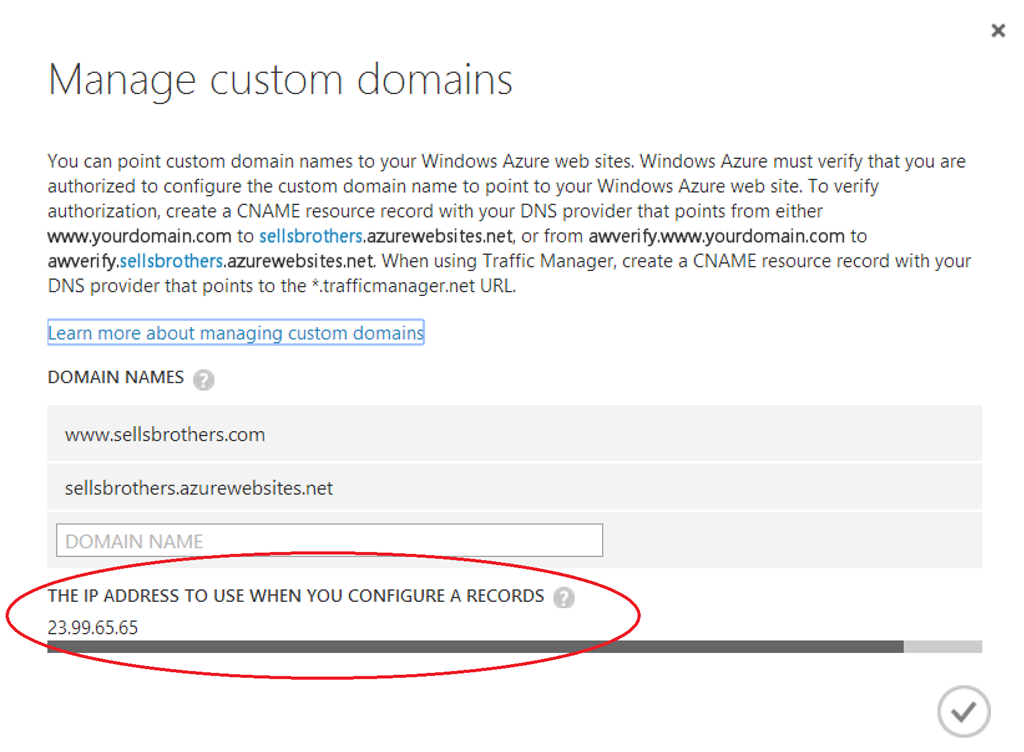
After adding the awverify and www host names and waiting for the DNS changes to propagate (an hour or less in most cases), I fired up the configuration screen for my web site and chose the Manage Custom Domains dialog:

image

Finding the IP address to use in configuring your DNS name server from Azure


Azure provided the IP address after entering the www.sellsbrothers.com domain name. With this in hand, I needed to add the A record:

image

Adding the Azure IP address to my DNS name servers


An A record is the way to map a host name to an IP address. The use of the @ means the undecorated domain, so I’m mapping sellsbrothers.com to the IP address for sellsbrothers.azurewebsites.net.

Now, this works, but it’s not quite what I wanted. What I really want to do, and what the Azure docs hint at, is to simply have a set of CNAME records, including one that maps the base domain name, i.e. sellsbrothers.com, to sellsbrothers.azurewebsites.net directly and let DNS figure out what the IP address is. This would allow me to tear down my web server and set it up again, letting Azure assign whatever IP address it wanted and without me being required to update my DNS A record if I ever need to do that. However, while I should be able to enter a CNAME record with a @ host name, mapping it to the Azure web site domain name, Office365 the DNS management UI won’t let me do it and Office365 support wasn’t able to help.

However, even if my DNS records weren’t future-proofed the way I’d like them to be, they certainly worked and now both sellsbrothers.com and www.sellsbrothers.com mapped to my new Azure web site, which is where those names are pointing as I write this.

However, there was one more feature I needed before I was done ported my site to Azure: secure posting to my blog, which requires an SSL certificate.

Configuring Azure with SSL

Once I had my domain name flipped over, I had one more feature I needed for my Azure-hosted web site to be complete — I needed to be able to make posts to my blog. I implemented the AtomPub publishing protocol for my web site years ago, mostly because it was a protocol with which I was very familiar and because it was one that Windows Live Writer supports. To make sure that only I could post to my web site, I needed to make sure that my user name and password didn’t transmit in the clear. The easiest way to make that happen was to enable HTTPS on my site using an SSL certificate. Of course, Azure supports HTTPS and SSL and the interface to make this happen is simple:

image

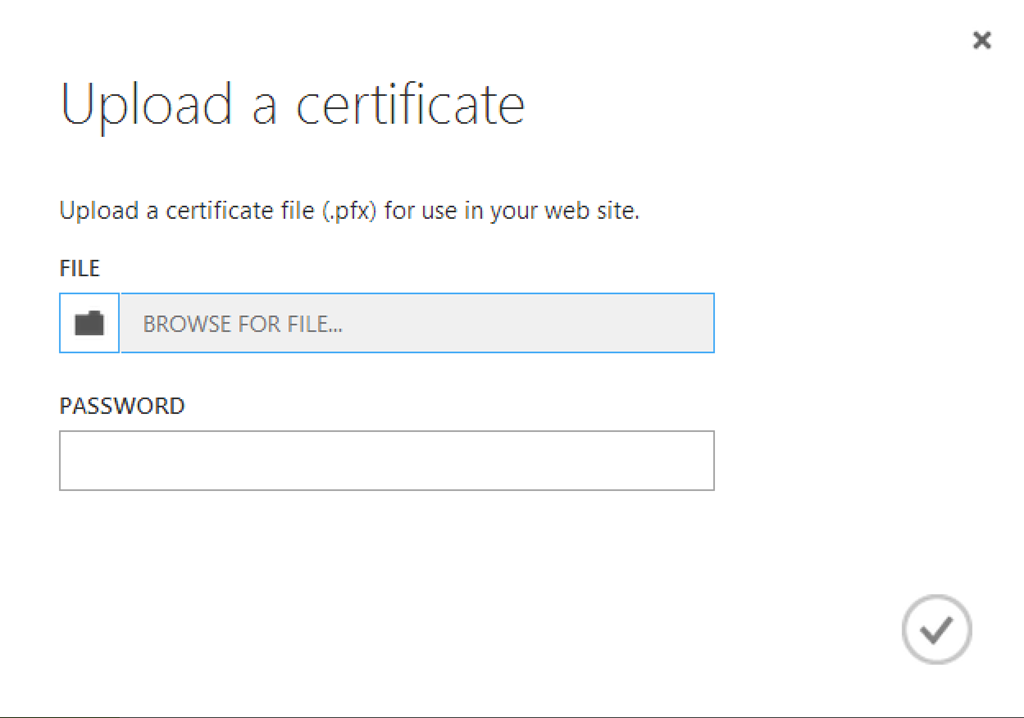
Azure’s certificate update dialog for added an SSL cert to your web site


Azure requires a file in the PKCS #12 format (generally using the .pfx file extension), which can be a container of several security-related objects, including a certificate. All of this is fine and dandy except that when you go to purchase your SSL cert, you’re not likely to get the file in pfx format, but in X.509 format (.cer or .crt file format). To translate the .crt file into a .pfx file, you need to generate a Certificate Signing Request (.csr) file with the right options so that you keep the private key (.key) file around for the conversion. For a good overview of the various SSL-related file types, check out Kaushal Panday’s excellent blog post.

Now, to actual dig into the nitty gritty, first you’re going to have to choose an SSL provider. Personally, I’m a cheapskate and don’t do any ecommerce on my site, so my needs were modest. I got myself a RapidSSL cert from namecheap.com that only did domain validation for $11/year. After making my choice, the process went smoothly. To get started, you pay your money and upload a Certificate Signing Request (.crs file). I tried a couple different ways to get a csr file, but the one that worked the best was the openssl command line tool for Windows. With that tool installed and a command console (running in admin mode) at the ready, you can follow along with the Get a certificate using OpenSSL section of the Azure documentation on SSL certs and be in good shape.

Just one word of warning if you want to follow along with these instructions yourself: There’s a blurb in there about including intermediate certificates along with the cert for your site. For example, when I get my RapidSSL certificate, it came with a GeoTrust intermediate certificate. Due to a known issue, when I tried to include the GeoTrust cert in my chain of certificates, Azure would reject it. Just dropping that intermediate cert on the floor worked for me, but your mileage may vary.

Configuring for Windows Live Writer

Once I have my SSL uploaded to Azure, now I can configure WLW securely for my new Azure-hosted blog:

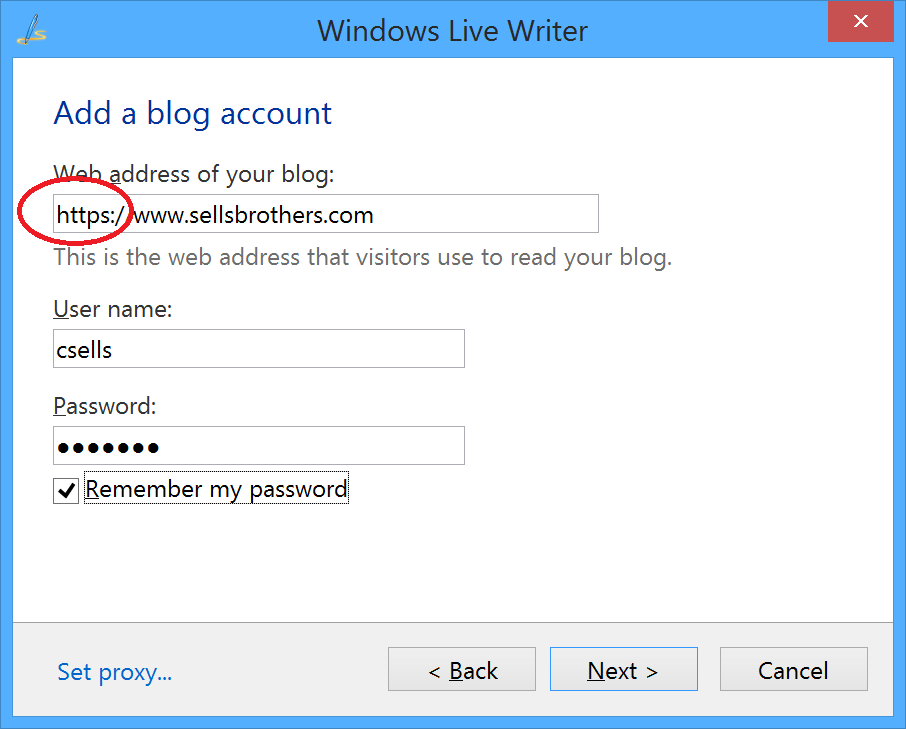
image

Adding a secure login for my Azure-hosted blog


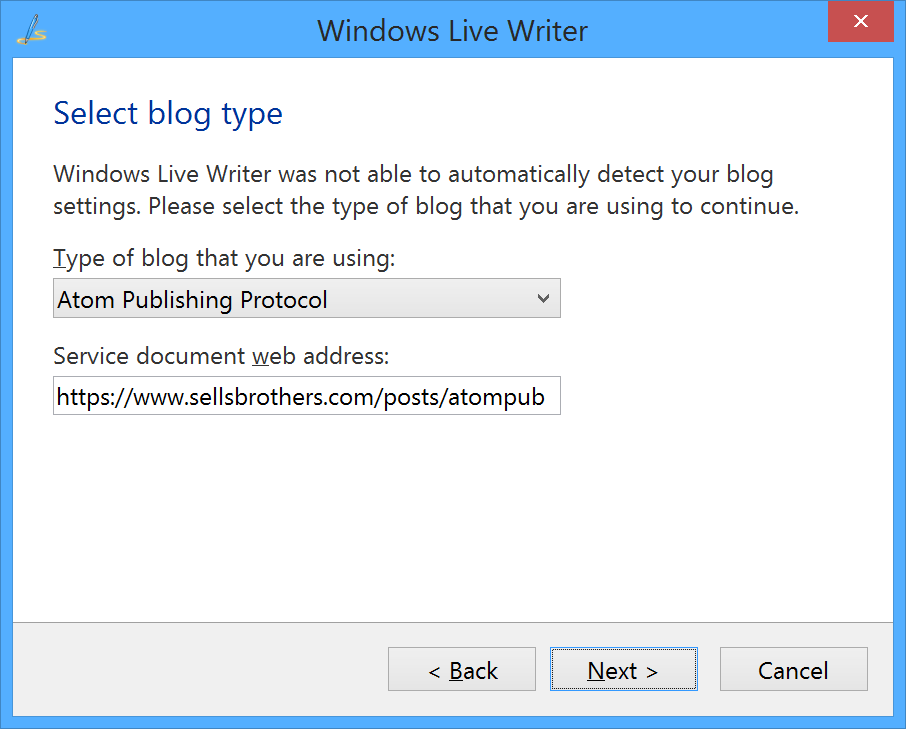
You’ll notice that I use HTTPS as the protocol to let WLW know I’d like it to use encrypted traffic when it’s transmitting my user name and password. The important part of the rest of the configuration is just about what kind of protocol you’d like to use, which is AtomPub in my case:

image

Configuring WLW for the AtomPub Publishing protocol


If you’re interested in a WLW-compatible implementation of AtomPub written for ASP.NET, you can download the source to my site from github.

Where are we?

Getting your site moved to Azure from an ISP involves more than just making sure you can deploy your code — it also includes making sure your database will work in SQL Azure and configuring your DNS and SSL settings as appropriate for your site’s new home.

At this point, I’ve gotten a web site that’s running well in the cloud, but in the spirit of the cloud, I’ve also got an aging comment system that I replaced with Disqus, a cloud-hosted commenting system, which is the subject of my next post. Don’t miss it!